On this page:
This page provides information about how to correct the automated captions provided by YouTube. Even you don't plan to host your video (or audio) on YouTube, you can use it to generate caption files and transcripts. These can be downloaded and used with other applications or hosting sites.
How do I auto-caption a video on YouTube?
Let YouTube’s automatic captioning tool do the heavy lifting for your video captioning.
TIP: You can use YouTube's captioning tool even for videos you won't show on YouTube. After you create or edit your caption files, you can download these files to use in other applications. Then, simply delete the video or use the private setting.
NOTE: You will still need to review and edit the auto-captions!
- In YouTube Studio, select Create and Upload Videos.

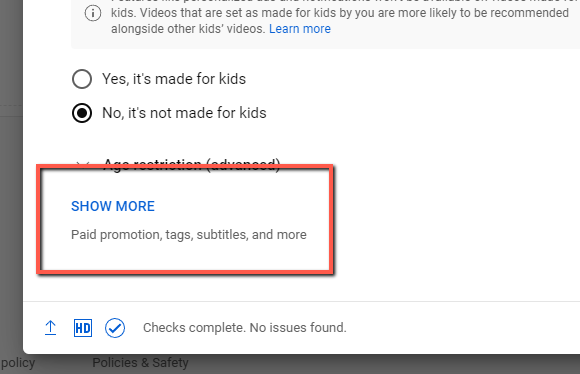
- Within the Upload Videos panel, select Show More.

- Under Language and captions certificate, select your video’s language.

-
Select Next and continue with your video upload. Ignore the Video Elements selection for the moment.
NOTE: Within Visibility, you can mark your video as Private. This will allow only you to see the video until the captions are ready.
- Select Save - and take a break. YouTube will work to automatically caption your video. This process may take several minutes to 24 hours to complete.
How do I edit the auto-captioning on my YouTube video?
Once your YouTube video has had time to auto-caption itself, you will need to review and edit the results. Auto-captions are a great tool to get you started, but aren’t perfect just yet.
- In YouTube Studio, select Content.

- Select the title of the video you want to review.

- Select Subtitles.

- Select Duplicate and Edit for the Video Subtitles ending in (Automatic).

NOTE: If you do not see a Video Subtitle ending in (Automatic), YouTube has not yet finished auto-captioning your video. -
Edit your video’s Transcript. Make sure your video has correct spelling, punctuation, capitalization, and important background sounds.
- Edit your video’s Timings.

- Publish your captions / transcript when you are finished editing.

How do I download these captions once I finish editing them?
- In YouTube Studio, select Content.

- Select the title of the video you want to review.

- Select Subtitles.

- Select Options within the Video Subtitles file you want to download.

- Select Download.

-
Download your preferred file type. For transcripts, we recommend downloading a .txt file and editing out the timestamps using NotePad++.
Caption Editing Tips and Tricks
- Try to ensure that lines have a maximum of 32 characters per line (but are still grammatically correct).
- Use the Scrubber tool to make minor changes to the time placement of each caption frame. The Scrubber tool is found below your video.
- Select the (+) Caption icon above your transcript to add a new caption frame.
- Easily adjust for pauses in speech by adding a break in the caption frame. You can do this by stopping your video at the pause in speech, placing your cursor inside the caption frame text box exactly where you want to break up the caption frame text, and selecting Enter to add the new frame (with the subsequent text) to the precise location on the video.
